Thursday, December 21, 2017

Official Number for 2017

BLUE is what we paid off in 2017
Last January, after evaluating our finances and goals, we decided we were in a good place to pay down our mortgage principal.  I blogged about the proposition of that goal for 2017 here: 
I've Got A Dream.  So this year, we've been living by a pretty tight budget and we've been doing great with it.  It is so FREEING to live by a budget and know exactly how much you have to spend in all areas of life for each month.  And the reward of beating the budget each month, is adding a little extra towards paying down the principal.  Yep- most people would reward themselves with a Starbucks or something else extra ... I guess I am of a different breed- I consider it a win to pay a little more down on the mortgage;)  We've moved from "tracking our finances" with a budget, into a land of "living within our budget".  And looking back throughout the year, and doing the math-- it has paid off.
paying down or mortgage principal.  I blogged about the proposition of that goal for 2017 here: 

STATS:
From Jan. 2017 to Jan. 2018 we PAID OFF $31,276.55 of our mortgage balance!!
From 2013- we have now paid off 36.5% of our initial mortgage

Initially we started with about $127,000.  My initial hope was to get down to $110,000 on our mortgage balance.  But once we started, that hope became an daily awareness.  With every purchase, I considered how that affected our goal.  And let's just say, I refrained from purchasing A LOT this year.  That's the only way a 1 income family could make that large of a dent in paying off debt.  We cut back spending in a huge way.  Basically every dollar that came in each month was accounted for, and spent on something.  Dave Ramsey refers to this as "Zero  Based Budgeting".  So all the money is spent on something- and in our c
ase, a lot of that money was spent on "Mortgage principal".  A lot meaning, $31,000!  Yay!  That initial goal of getting the mortgage principal balance down to $110,000 then turned into breaking $100,000.  And we did it!  We're heading into 2018 at $95,276 to go.  So in 12 months we were able to trim down $31,000 of our home debt.

So if that isn't inspiring and motivating in a personal finance realm- I don't know what would be.  If you give yourself a financial goal, and you have a plan of how to reach that goal- then your money won't keep magically disappearing on you.  Because let's face it, that is exactly what happens every month when you don't have a plan.

We are still on an early pay off plan for our mortgage, however our goal for 2018 is to redirect a majority of our excess money towards a sinking fund for an exciting change in 2019!  Sadly we won't be bringing that mortgage balance down as drastically as we did this year, but we have a plan for something great in the near future.  And in the mean time, we will keep chipping away at our $95,000.


Here's to a NEW YEAR of making and achieving NEW GOALS! Happy New Year!


Wednesday, October 18, 2017

Are you a slave to the Lender?

This photo was of our progress a few months ago.
By the end of this 2017, the word "MORTGAGE"
will be all colored in BLUE.
If you were to really take the time to consider your financial state TODAY, how would you rate yourself on a scale from 1 to 10, of where you want to be?  A 1 would be "not at all where I want to be" and a 10 would be "doing better than I deserve".  Are you an "average" American?

-76% of Americans live paycheck to paycheck
-Average American household wastes 24% of their take home pay on consumer debt
-64% of Americans could NOT cover a $1000 emergency

Student Loans, Car payments, Credit Card debt, Mortgage....  How much does that all add up to each month?  Could you imagine changing that value from "money owed" each  month to "money saved" each month?  Now multiply that by 12, and that's what you have over the span of a year.  Incredible to think that you could have that much money at your disposal to do what you wanted with- to tell your money what to do, rather than have you money tell you where it's going.

Most people have just accepted that they will always have some sort of debt.  But that doesn't have to be you.  You could be WEIRD- and be living a life in complete financial freedom.  You could be someone who could drop $1000 at any given time to be generous and change someone else's life by helping with an emergency or need.  It's time to change the trajectory of your financial life and get free of being slave to the lender.

We are considering hosting a Financial Peace University class.  Check out the link to find out more about the 9 week lesson outline in the  FPU Preview.

If you are interested in joining the class, please let us know!  

It involves 9 weeks of class, 1.5 hours x 1 evening a week.  


MY STORY-
I was introduced to Dave Ramsey by my mom in 2004, right after I graduated from college.  She would talk my ear off about his book, "The Total Money Makeover".  I was like, "yah, yah... ok mom."  So she sent me the book.  I read it.  I was completely inspired.  I started working the Baby Steps.  I got my $1000 Emergency Fund into place and then started chipping away at my $22,000 of student loans.  I trimmed my spending down as much as I could, and was able to pay of my student loans by December of 2005.  In 18 months I was able to pay off $22,000- only working part time hours.  Once out of debt I started savings funds for different anticipated expenses like my next car, home repairs, travel...  Fast forward to today.  One year ago, 2 years into our 30 year mortgage, my husband and I refinanced our mortgage down to a 15 year mortgage and got an incredible interest rate in the process.  That was a smart move, and it only cost a little less than $100 each month.  Now we could have our house paid off in 2030, as opposed to 2043.  Who even thinks that far ahead?  But the reality of this change meant that we could have our house paid off before any of our children went to college.  But the truth of the matter is I am all about being completely debt free as soon as possible.  So we started paying an extra $100 to the mortgage right away, which would be about 1 extra mortgage payment a year.  This would cut our 15 year mortgage down by a few more years.  Cool.  But paying down debt is a bit addicting for me, and I got the Laird on board with putting anything extra we have into our mortgage.  My goal now is to make our final mortgage payment for our 10 year wedding anniversary in August of 2020.  That's less than 3 years from now!  This February, We started out with a "No Spend- Frugal February" budget.  And we've pretty much kept that pace ever since.  

It's time to change your life! Wherever you are at in your journey, movement comes from working through hard things with other people.  You will find encouragement and accountability in the area of finances.  Have a plan for your money, rather than continuing on your current trajectory.   The FPU membership kit costs $93, but there are people selling used versions (and even some new) for less on ebay.  If that stands in the way, commit yourself to setting aside $1 a day for the next 3 months.  It's a small price to pay to get on track for a better financially free future. 

 I am hoping we can start a class in January of 2018.  

Tuesday, September 5, 2017

Beekeeping: It's a way of life

It's been a while since I posted.  Almost 4 months to be exact.  Reason being that our family grew by a little person- which made it somewhat difficult to figure out how to get into the hive to inspect.  Since we're still quite new to beekeeping, we feel it's a tag team- 2 person job.  The Laird pulls out the bars, while I run the smoker, take photos & clean bees out of the way to put the bar back inside.  

Back in May we installed 2 packages of bees into our 2 Top Bar Hives.  This is 1 more hive & colony of bees than we had last year- our first season in beekeeping.  We made the move to get a 2nd hive last winter, in hopes of catch a swarm from our 1st colony and then having 2 hives going.  We thought this would provide a 2nd chance in case we lost a hive during the winter.  Well unfortunately, we lost our sole hive.  So we bought a package of bees, not thinking we were going to be able to get our hands on a swarm.  And then we bit the bullet and purchased a 2nd package of bees for the hive we had purchased last winter.  

Installations went well.  And things seemed to be moving right along.  Then at some point in June or July, we noticed some queen cells (meaning the bees were preparing to swarm & multiply).  One day we walked out back and saw thousands of bees flying around- what you'd imagine a swarm to look like.  The Laird, said "look at all those bugs!".  I responded, "I think the bees swarmed".  He went to get his phone to take photos, and by the time he returned, the swarm had flown off into the woods.  And that was the story of how our colony size diminished by half it's size.  Swarming in May or early June is ok, later than that just jeopardizes winter survival- since you loose half your bee population.  Not a great thing, but there was nothing we could do at that point.  The bees still had time to build up their numbers before winter and store honey.  Honey also diminishes during a swarm because they bees who will leave gorge themselves on honey reserves so they will be all set until they find a new home and are able to get back to work.  

Fast forward to last week.  We noticed queen cup cells again in the same hive, and didn't think they could possibly swarm again. The next morning I went out to check on the bees.  The queen cells were capped!  The number of bees also seemed a little lighter than usual- but I didn't think anything of it because maybe they were all out foraging.  It was a nice day after all.  Later that day, I took the kids out back to play on the jungle gym.  From 100 ft away, I glanced over to check out the bee activity outside the hive.  I noticed a dark spot on the tree branch in a pine tree behind the hives.  Immediately I wondered if the bees had swarmed to I ran over to check it out.  And this is what I saw above me.  


The Cedar Hive had swarmed AGAIN!  On the last day of August, our bees had decided to go on a suicide mission.  I immediately texted & called the Laird at work.  When he got home, we grabbed a cardboard box and set out to capture our first swarm.  It was easier than we thought.  They plopped right into the box.  We closed it up and put it in the garage.  Then we had to figure out what to do with this swarm.  We started scouring the Internet with ideas.  Could we go into the hive and kill the newly raised queens, and then reintroduce the swarm (with the old queen) back into the hive?  Should we let them go and just try to build up the colony that stayed behind?  Should we get another hive?  Should we build another top bar hive?   I checked craigslist and there happened to be a gentleman selling his beehives and equipment.  He just happened to be selling 2 homemade Top Bar Hives and a handful of Langstroth hives.  The Laird said I should try to get in touch and get one of the top bar hives, since it would cost less to buy these used hives than build one.  Communications with the seller were slow, but after 4 days in a cardboard box, and a 2 hour round trip drive, we finally had a solution for this swarm of bees.


Top Bar from Cedar Hive.
Capped honey along the top.
Worker bee brood on left side / Drone brood on right side of comb

One of his homemade top bar hives was built to similar dimensions as our top bar hives, so I purchased that one.  I was definitely going to buy one of the TBH, but then decided maybe we would get both.  Early on the morning I was set to drive out to get the hives, I thought it might be cool to get one of the Langstroth hives and eventually get a Ross Rounds kit.  The Ross Rounds are a system of getting the bees to build their comb in a circular ring, capping it, and then being able to have perfect honey comb in a plastic container.  They are beautiful.  I shared this thought with the Laird, and he agreed as has wanted to get a Langstroth hive just to learn how to do it.  

So I drove an hour away, and met a wonderful gentleman who had been beekeeping for about 8 years.  We talked a lot and I asked him every and any question that popped into my head.  An hour and a half later, I was on my way home with 1 Top Bar Hive and 1 Langstroth hive, for the cost of less than 1 hive set up.  He even loaded me up with frames that already had comb built up- so that our swarm would have a head start and be more willing to stay.  

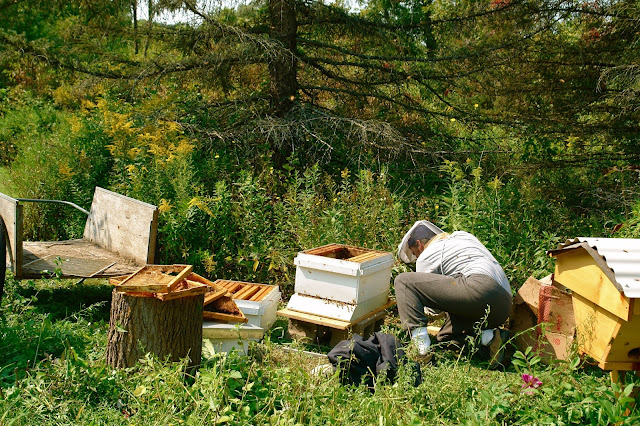
Upon arriving home, the Laird and I got to work setting the hive up.  We had wanted to put the Langstroth hive in between our Top Bar Hives.  But when the Laird went to pour the bees in, from our very soggy 4 day old cardboard box, things were much crazier than our previous swarm and package installations.   In the 4 days that they were living inside the cardboard box, they had chewed through the holes we poked for them to breath- and could freely go in and out of the box. The bees went CRAZY, and very few of them ended up inside the hive.  Then we realized many of the bees had covered the mason jar feeder that was sitting in the spot that the cardboard box was sitting.  So the Laird brushed them into the hive.  A couple minutes later, I noticed that they had then covered the smoker!  Basically anything sitting in the spot that the cardboard box was previously position, was where they were identifying as home.  So we realized that we needed to move the Langstroth back over to where the cardboard box had been, and if they survive winter, we will worry about a better location then.  
The Laird setting up Langstroth Hive between Top Bar Hives (initial location)

Bees clustered on smoker
What an adventure.  We have no idea if the queen made it into the Langstroth hive.  We looked around for her on the ground.  The bees have gone into the hive and are busy at work, but only time will tell if there is a laying queen in there.  We will have to do an inspection in a week or so.  All that said, we are learning a lot on this beekeeping adventure and will continue to learn.  It's awesome to have 2 new hives to expand into.  Once you are keeping one hive, it only makes sense to have a handful;)
Smoker covered with bees.
Langstroth Hive relocated to the spot where the cardboard box homed swarm sat for 4 days


Drone cells with emerging bees on left/  Worker brood on right

The Laird in the midst of swarming bees

Lady Genevieve- our budding photographer

Redwoodshire homeschooling:  Living out learning


Bees at entrance of Langstroth Hive


Saturday, May 27, 2017

2nd Top Bar Hive Bee Installation

We are getting pretty comfortable installing packages of bees into our Top Bar Hives.  It only takes about 10 minutes to leisurely install the bees.  Here are some photos from yesterday's installation. 

Weather conditions:  About 60 degrees F.  Light misty drizzles.  Time: 4pm.

 Here's the Laird opening the top of the package.  First you pry open the stapled down piece of wood.

The next step involves sliding the sugar syrup feeder tin out of the top of package.  Notice the black strap stapled into wood to the right of the feeder tin- this is the strap holding up the Queen cage.

If you look closely you will see the Queen (marked with a yellow dot on her back).  She is noticeably larger than the worker bees.  She is raised and then added to a separate colony of bees.  She is enclosed in a cage with a sugar plug that the bees have to eat through.  The amount of time that it takes to eat through the sugar plug, allows for the colony of bees to get accustomed to this particular Queen's pheromones.  If she were introduced without time for the bees to get to know her, they would likely attack and kill her.
 Once Queen cage and feeder tin are removed, cover the hole of the package with a towel to keep bees inside.  Then you bang the whole package on the ground to get the bunch of bees grouped together on the bottom of package.  Then you just tip and pour bees into Top Bar Hive.
Welcome to your new home Bees!  This is what 3lbs of bees looks like- which is approximately 10,000 honeybees & 1 Queen.

The other end of the queen cage has a tiny cork in it.  Our bees had been traveling up from GA since Monday evening, so they had 4-5 days to get accustomed to each other.  We just removed the cork and released our Queen into the hive.  

That's our process of installing a 3# package of honey bees & queen into a Top Bar Hive.  The important thing is to have all the tools you need before starting the process.  We bring our protective veil & gloves, hive tool, a towel, pliers, a mason jar feeder full of sugar syrup.  We included a few bars of brood comb from our previous hive- to give the bees a little head start on their work and the queen a place to start laying eggs.  This hive was installed about 2 1/2 weeks behind our first hive.  

We look forward to watching each hive progress and possibly seeing the differences between NY & GA raised bees.  First hive currently has 10 bars of brood comb built up, in a space that fits about 28-30 bars (not sure).  Already 1/3 full!

Friday, May 26, 2017

Bee Updates- A 2nd Hive

We've been busy at Redwoodshire, but probably not as busy as the bees.  A few weeks ago, one of our great Pines fell.  Fallen trees are A LOT of work to clean up.  The brother of a friend of ours recently purchased an old lumber mill, and willingly wanted to take that pine off our hands.  While he was here, we decided to take down another pine tree over near the apiary.  The Laird had already been talking about taking that tree down to create more sun for the bee hive during the cold, bitter winter months.  So with 2 trees to clean up, branches and huge chunks of trunk, we were busy.  I told the Laird he was lucky to have me as a wife;)  He asked, "Why?".  "What do you mean "why?"!  I informed him that most 34 week pregnant wives would most definitely not be helping with tree clean up and lugging wagons of brush to the woods.  But the work needed to be done, and it feels good to get a little physical exercise at this point in the game.

About a week after installing our bees, and being reminded just how much we love having them- we decided to bite the bullet and purchase a 2nd package of bees for the new hive we bought over winter.  Initially we had hoped our colony from last year would survive and just swarm into the new hive.  But with our colony loss, that wasn't possible.  And the possibility of catching a swarm was seeming more and more unlikely, as I reached out to a few contacts with no luck.  Rather than have our hive sit empty in the garage (taking up space) and waiting another year for a good honey harvest, we decided to just spend the money on another package of bees.  Our first bees we ordered from an apiary about 3 hours away.  At this stage of Spring, most places are sold out of packaged bees.  But I found a place in Georgia (where most bee packages come from) that still had packages available for shipping.  So we ordered another package, set up our new Top Bar Hive and waited patiently for the bees to arrive to our post office.

Finally, after checking into the post office in Georgia on Monday night of this week, and traveling all week through the postal service with no tracking updates.... our new bees have arrived!  I had expected the bees to arrive yesterday at the latest.  So when there were no tracking updates and they didn't arrive, I started to get concerned- especially with the holiday weekend upon us.  Where in the US were our bees?  I was pleasantly surprised at how few dead bees there were on the bottom of the package, considering they have been traveling since Monday night.  They look amazingly well.  Once we open the package we will be able to inspect the queen and see that she looks good.  We will install this package of bees later this afternoon.

Here's a photo of both hives set up, in the newly cleared space of our apiary.  You can see the tree stump between the hives.  The original hive is the darker- cedar one on the left.  The new hive is made of sugar pine and has a nicer stand- on the right.  The Laird also installed corrugated plastic roofing on both hives, to help prevent water leaking into hive.  We had a small issue with this at the end of winter, and wonder if this contributed to our hive loss.

We plan to name the hives, so we can keep straight which one we are talking about.  Any thoughts?  Now to keep all the weeds surrounding the hives in check- that will be a challenge in itself.  Planning to plant wildflowers around the apiary.... we will see how that works out.  Weeds always seem to win.

The Redwoodshire Apiary


It's been about 2 1/2 weeks since our first bee installation and the bees have been busily building their comb.  We included some bars of brood comb & honey comb we had left from last year's non-surviving bees.   That helped to give them a huge head start.  They currently have 10 bars of comb built up.  It's time to open the hive up and inspect to see if the queen is laying eggs.  That may happen today while we install the other bees, or sometime this weekend.  But the overall picture.... is that they are doing great.  We saved out a few top bars of comb to put in the 2nd hive to give this new package of bees a little head start as well.

Looking forward to taking some photos of the bees inside the hive!

Tuesday, May 9, 2017

Top Bar Hive Installation of Bees


And the bees have been installed.  Bees bee-haved and got into the hive.  Kids behaved watched from a distance.  Here are some photos taken by me and lady Genevieve of the process.  At 4 years old, I must admit that the girl has some photography skills already.  Check out our you tube video for the beginning to end installation (not great resolution as our camera is quite old).

Redwoodshire Top Bar Hive Bee Installation 2017


The Laird & Lady of Redwoodshire opening package of bees- armed & ready for installation


Watching and waiting for install to finish

Package of Bees Pre-Installation

Package of bees after Installation- remaining bees will make their way into the hive

Top Bar Hive from Bee Thinking


Making their way into the hive
Feeling good about our package installation
The Laird thinks he saw some worker bees within the Queen cavity when he installed the Queen cage.  This is causing him some concern- as the worker bees are supposed to eat away at the candy plug and get acclimated to the queen and her pheromones.  This takes a couple days to do, and then the risk of the workers killing the queen is low.  He likes to worry things.  I tend to take the path of less worry, and just waiting to see what happens.  The sun peaked out for the first time in days today, which is promising for our installation.  

We minimized the top bar space to about 11 bars, so that the bees can keep warm and work on filling this space.  Some bars are empty brood comb.  Some bars are capped honey.  And then we included some empty top bars for them to start fresh upon.  

Really excited to have bees back at Redwoodshire.  With our hive loss last month, it just felt like something was missing.  And it was.  Had the colony survived, this would be an exciting time to be observing their activity.  They love the dandelions and early blooming flowers.  This colony has a little head start with a number of bars of comb already drawn for brood, and some bars of honey to eat until they get established.  

Bees are pretty amazing creatures, and I look forward to observing them this season and hopefully seeing them through next winter.  I love sharing what I know and have already learned about beekeeping with those who are interested.  

In other news, I just ordered a few candle molds & supplies from Mann Lake.  The friends we acquired our swarm from last Spring are moving and have offered to give us a trash bag of beeswax! I am really looking forward to learning how to make some candles from all this wax we will have on hand.  This will likely be an activity for late summer or Fall, as I have a lot of processing of wax to tackle first.  Initially, I have to let spread our crushed wax comb out on pans and let the new bees clean all the residual honey off it.  They do an amazing job.  Then I will set up our homemade solar wax melting system to both filter & melt the wax down to solid pieces.  After that I will be ready to get my candle making on!  I got 3 different molds to work with.  I am hoping to make some gifts from this beeswax.  

JUST IN! The BEES have arrived

3# package of bees is equivalent to about 10,000 bees & 1 queen

We just got back from the Post Office, where we picked up our new package of honey bees.  Last year, we were fortunate to obtain a swarm of bees from the Laird's friend.  He caught the swarm in a cardboard nucleus box-  we picked them up- dumped them into our hive.  Easy peasy.  Slightly different process for ordering a 3# package of bees.  We were unsure which post office the bees would arrive at for pick up.  When would they call?  Lots of unknowns.  I signed up for text message tracking of our package, and was able to follow the bees journey that way.  The post office called me a hour ago, and off we went.  They were waiting for us on the front counter- all ready to come to Redwoodshire.  The bees look excellent, so far as we can tell.  There are only a handful of dead bees on the bottom of the box- which is a good sign.  Now we will wait until later this afternoon/ evening to install the package into our Top Bar Hive.  This is the preferred time to install packages of bees is during the evening, so that the bees have time to get oriented to their new home.

Another difference between a wild swarm of bees and a package of bees that you purchase is the queen.  A swarm comes with it's own queen- a queen that it knows and it part of it's genetic line.  With commercial bee production, the queens are produced and then packaged in a little cage with a candy plug.  The bees don't know their queen.  They just get paired up and set off.  The candy plug acts serves to slowly acclimate the queen to her new colony.  The worker bees eat away at the candy plug, and then during the time, the queens pheromones are recognized by the workers and they have that time to get accustomed to each other.  The worker bees would attack and kill the queen if there isn't sufficient time for acclimation.
The kids are as excited as us to have bees again.  They are so fascinating to observe.

If interested, stay tuned for the package installation into our Top Bar Hive which we will be doing later this afternoon.  Posts to follow.  We will likely contribute various other posts throughout the season, with inspection and how they are doing.


Monday, May 8, 2017

Changes of Landscape- Unplanned & Planned

Last month, our area was hit with the strongest windstorm that this area has seen in years.  It did damage to many trees in the area, and caused loss of power for thousands.  We survived the storm without any major damage, and only loss power while they shut it off to do repair work elsewhere.   The first night of power loss was actually sort of fun, as we lit some candles, played guitar and sang songs, and went to bed early.   We heat with a wood stove, so we had heat throughout the 30 hours of power loss, which was wonderful.  Though none of our trees fell, we noticed that one of our pine trees, seemed to be tilted more than normal.  Upon closer inspection, we noticed the base of the tree was cracked.  Though the tilted tree looked a bit silly, it was still standing.  

The weather has been unseasonably cold and rainy for May, so we did not go outside to play today.  When the Laird went out back to weatherproof  the roof of our Top Bar Hive, in preparation for the arrival of our bees tomorrow, he discovered a very changed landscape!  That old pine tree, that we hung our hammock from during the past 3 summers, was no longer tilted or standing.  It was sprawled across our lawn!  He came back into the house to get me to come and see the changed landscape of our yard.  My first thought was that there had been another "chicken massacre"-as the last time he came into the house declaring ominous news, it was 2 incidents in one week where we had lost a chicken to a predator- likely a hawk and a fox.  Not this time.  Just the tree.  


 In other news, we found an old Jungle Gym play set on craigslist a few weekends ago. This change to the landscape was planned.  The kids are at the perfect age for a play set, but we hadn't quite found the right one.  We were also intimidated at the prospect of having to disassemble, transport and then re-assemble a play set.  So we've been sitting on this hope for some time.  This particular jungle gym was a great deal, that included the generous service of moving it in one piece (minus the slides) and transporting it to Redwoodshire.  Once the seller offered to help transport the thing in one piece, I was sold.  What kind people they were.  I have always had wonderful luck meeting wonderful sellers on craigslist.  The whole process was so easy because they had a trailer and were willing to help us out moving the monster of jungle gym.  The only drawback is that we aren't quite happy with it's location and will be looking to move it back towards the woods.  That will be a challenge for another day.  Though the weather has been lousy- cold & rainy- the couple times we have been able to play on the jungle gym, the kids have both built up their confidence to go down the slides.  We do need to re-paint and sand a bit to help smooth some of the splintery edges- which we will tackle as the weather gets drier.  


As for now, the Laird has a new task before him of cutting this pine tree up and clearing it from the yard, in time for our annual Memorial Day party in a few weeks.  Sadly we won't be able to enjoy the shade of this particular tree any longer & we have to find a new place to hang out hammock.  On a brighter note, the blueberries will receive many more hours of sunlight, and be more productive now that this tree is no longer standing.  And the pool should get a little more sun too.  This change of landscape will take a bit of time to get used to, but we are thankful that it didn't fall on anything and cause any structural damage!


Monday, May 1, 2017

Beekeeping Updates- 1st Redwoodshire Honey Harvest

A fun learning experience for the whole family
We're approaching the one year mark of being beekeepers.  We got our swarm in May of last year and enjoyed watching our bees build their comb and do their thing.  The colony seemed to survive through the winter, as they were out flying during some of the unusually warm days we had in February.  Then we got blasted with a bunch of wind and snow during March.  And then our bees were no more.  Totally gone.  A very, very sad reality.  This past weekend, we opened our hive to harvest honey for the first time.  We took some photos of the Top bars and dead bees to see if we can deduce what may have happened to our colony.

Cutting honey comb into the bucket
Capped honey & empty brood cells


This honey harvest is one we've been looking forward to since we got our bees last Spring.  It was quite easy considering we had no bees to work with, and just got to go into the hive, pull out the top bars of honey and cut the comb off into our buckets.  Sad as our loss was, we enjoyed dipping our fingers in the crushed honey comb for that fresh honey.  This kept the kids busy while we examined the hive and worked on cutting the comb from the top bars.  We harvested 8 top bars of honey.


DIY Crush & Strain bucket system
We built a 2 bucket crush & strain system for our honey harvest.  Here's a video of how we made our Crush & Strain Bucket System.  We used 2 buckets & lids.  The top bucket has a bunch of small holes, close together drilled into a circle at the center of the bottom of the bucket. The bottom bucket lid has a large hole cut into the center.  We also installed our own honey gate about 1 inch from the bottom of the lower bucket.  Then we placed a 5 gallon paint strainer in the top bucket and placed the honey comb inside that.  We placed the honey comb into the top bucket, inside the paint strainer.  Then we used a potato masher & knife to crush the comb and release the honey from the cells.  It took about 4 days to completely strain all the honey into the bottom bucket.   Bottling the honey was quite fun.  We bottled both 1/2 lb. and 1 lb. glass bottles with lids from BetterBee to store our honey for sale & gifts.
Honey Gate ordered from Amazon

Crushed & Strained honey comb- honey drained out


Since we got our swarm of bees last Spring, we have been talking about establishing a second hive.  The purpose of this would be to have at least one of the 2 colonies survive winter, and thus be able to repopulate our 2nd hive with our own bees (in case of loss).  We purchased a 2nd Top Bar Hive from Bee Thinking over the winter.  Now we have 2 Top Bar Hives and ZERO bees.  The friend whom generously gave us one of his swarms last Spring lost all 4 of his hives this past winter, so unfortunately for both of us, there will be no swarms to give for winter losses.   Davis Family Honey Farm is only a few hours from us and is one of the few places I found that was not sold out of packaged bees for this Season.  

So that's the update on Redwoodshire Beekeeping for now.  We should receive our 3# package of bees around May 8th, and will update our bee installation at that point.

Here is the fruit of our bees' labors!  We ended up with about 21 1/2 lbs. of raw, unfiltered, treatment free honey.  Considering we only harvested 8 top bars of honey comb, this was more than we knew to expect.  We would have double that if the whole Top Bar Hive were completely full! With fingers crossed we can find a swarm to fill our 2nd Top Bar Hive, and we will have an abundance of honey to sell next season.


Redwoodshire Honey (1/2 lb. & 1 lb.)- Raw, Unfiltered, Treatment Free Honey