Sunday, April 27, 2014

Breakfast At Redwoodshire~ A Most Delicious Granola Recipe


Oh how I love thee, let me count the ways...  You are crunchy, and sweet, and nutty, and a little fruity too.  Who doesn't love a crunchy bowl of granola?  There are various ways it can be eaten.  Like a bowl of cereal with milk (or a yummy milk alternative- Almond Milk).  Mixed with yogurt or kiefer.  Or just straight up by the handful as a snack.  I found this recipe on All Recipes.com, and have been making it ever since.  It's become somewhat of a staple in our household, as I often eat it every morning.

Ingredients: 


This makes 15 servings.


Can be found in the cereal aisle


1)  Preheat the oven to 325 degrees F.  Line a large baking sheet with parchment or aluminum foil.


2)  Combine the oats, wheat germ, oat bran, sunflower seeds, almonds and walnuts in a large bowl.  Stir together salt, brown sugar, maple syrup, honey, oil, cinnamon and vanilla in a saucepan.  Bring to a boil over medium heat, then pour over the dry ingredients, and stir to coat.  Spread the mixture out evenly on baking sheet.)  

3)  Bake in the preheated oven until crispy and toastsed, about 20 minutes total.  Stir once halfway through at 10 minutes.  Cool, then stir in the golden raisins or craisins before storing in an airtight container.


I highly recommend Vanilla Almond Milk as a companion for this tasty granola.  Like I said, I found this recipe on allrecipes.com and cannot take the credit for such a fabulous combination of ingredients.  It's better than any granola I have ever had!  And it's a lot cheaper too.  Buy the ingredients in bulk- as you will likely be making this batch for years to come!  "It will change your life!"

Saturday, April 26, 2014

Step By Step Kitchen Renovation- Part 1


Redwoodshire was in need of a more practical kitchen.  It was spacious indeed- but the original layout was a very inefficient use of that great space.  We sat down with a pen and paper, and dreamed up our ideal kitchen.   We then connected with the Laird's friends at Morse Sash & Door Morse Sash & Door and began discussing the process.  I never imagined how many decisions there are to make when renovating a kitchen.  The great advice we received: Design our ideal kitchen, price it out, and then whittle those "wants" and "needs" down to something that we could actually afford.  There are so many choices.  And then there is the cost.  Very few people have unlimited resources- most have a set budget to work with- and we are those people.  Here are photos documenting the transformation our kitchen has taken.
The original kitchen.  Don't you love the checkered vinyl floor?  


This is a view of the other side of the kitchen.  To the left is the Great room.  Straight through the little door, is the dining room and stairs. 


We had the doorway widened to match the door from the Great Room.


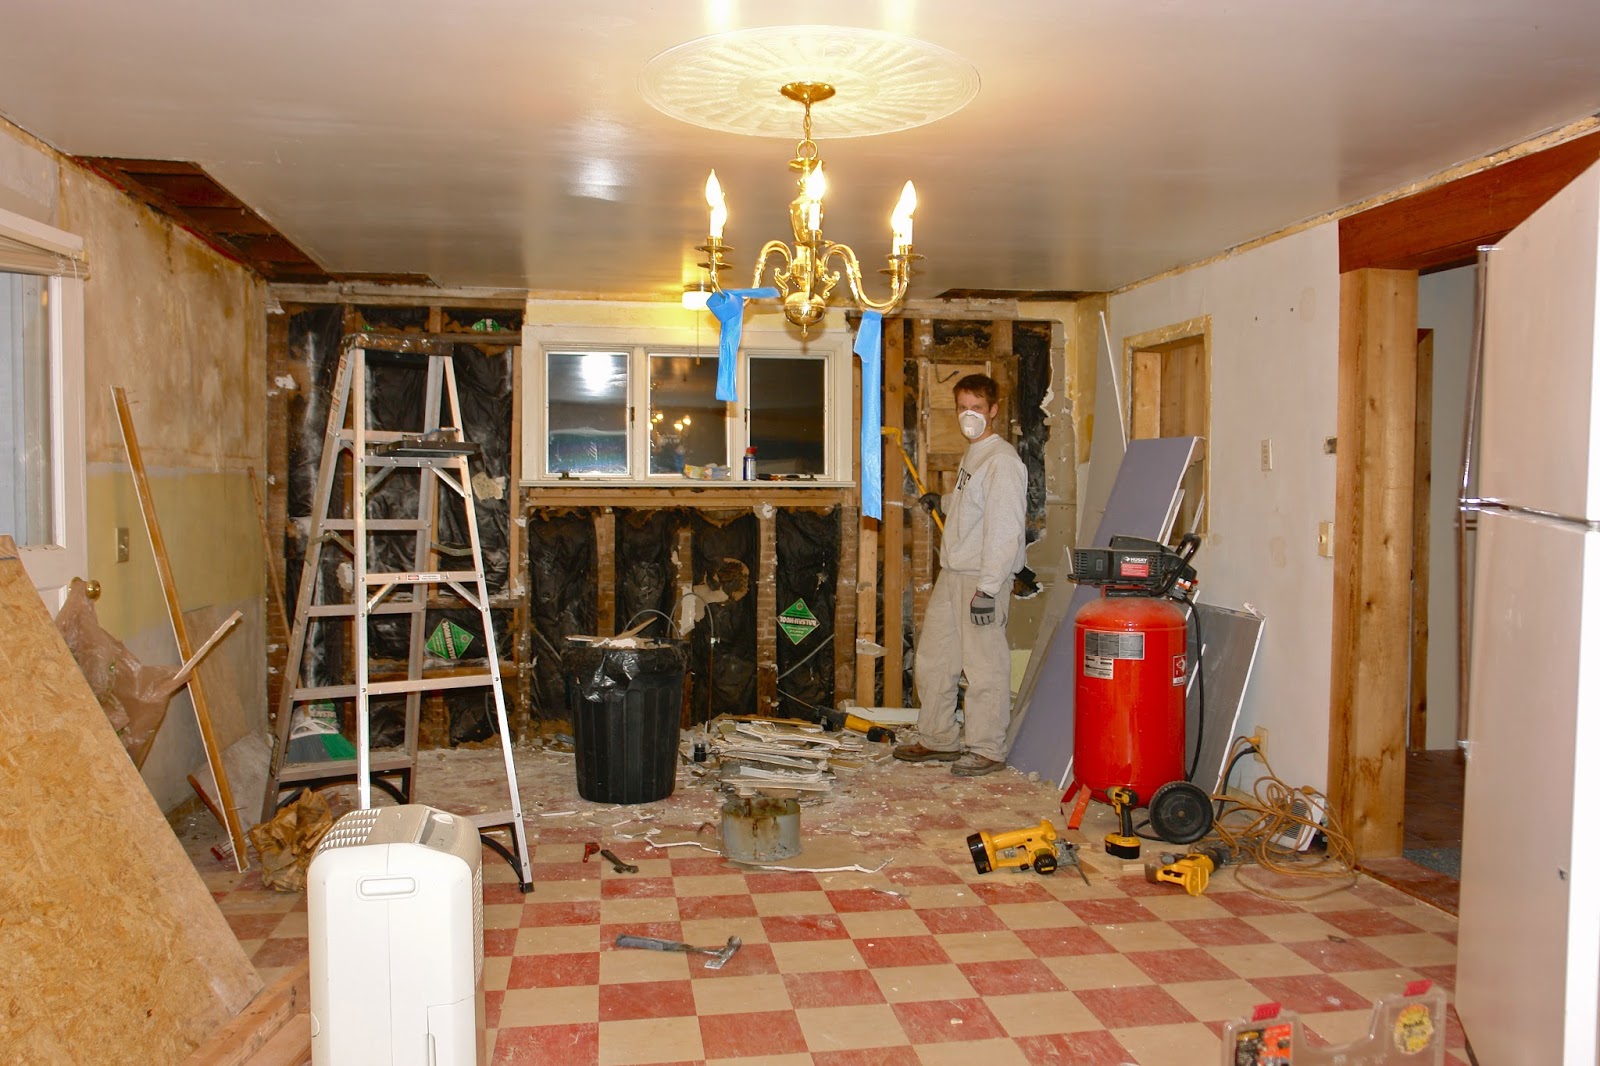
Demolition Time:
The laird removed upper/ lower cabinets.  Removed refrigerator & oven.  Then handy Thomas helped close up the exhaust vent.      

One thing leads to another.  With renovating old houses, you start with an original intention, that often grows into a lengthy reality- as unexpected extra projects pop up all along the way, to fix the old problems.  
This exterior wall had to be stripped down to the studs because of it's unfortunate lean outwards.  In order to attach upper cabinets, this wall would need to be level.  And so the demolition began, and ended with a more level wall.
Newly insulated wall w/ 2 new electric outlets
With drywall finished, the next step was to trace a level line along the wall, as a guide for where the bottom of the upper cabinets should sit.  Here they have installed the very first cabinet!


In the 180 years this house has been standing, this particular corner of the house had settled a few inches lower than the rest.  It was necessary to level the floors.  Then Trusty Jeremy assisted in installing upper cabinets and setting lower cabinets in there place.  Now it's starting to look like a kitchen again.


The Omega cabinets officially installed!  First coat of paint on finished walls and a working sink!  

Newly installed Corian counter tops (Sahara).  
Cabinet pulls & knobs installed.  
Pottery Barn Light fixture installed.
Signature Hardware faucet installed.
The Laird learned how to plumb a sink from YouTube videos.  

The next installment of photos will continue the process of transforming this kitchen!  Another future post will feature photos highlighting details of the products chosen for our kitchen.  


Thursday, April 24, 2014

"If you build it, they will come"... Our Garden Emerges

One of the things we are most excited about our beloved Redwoodshire is the opportunity to have a real garden and learn a lot about gardening along the way.  Previously, we lived in the city and had a mini garden in our tiny backyard.  We maximized that space as much as the sun would allow, and were able to get plenty of green beans for eating and freezing, a few zucchini, sufficient tomatoes, a few wild strawberries and a small portion of raspberries.

Raised planter at our old house in the city
We constantly battled the reality of huge trees blocking all of the sun over our yard.  There wasn't much we could do about that, so we started focusing on partial sun/ shade plants- hosta, hydrangea, fern, trillium, mayapples...  At the time, there was a junk pile at the back of our driveway that was an eye sore for many years.  An old broken down motor cycle, weeds, trash containers, scrap wood.  Finally, we decided to clean that corner up and build a raised planter for more shade plants.

 So fast forward to Redwoodshire .  We love the land, and are making the house into something we love as well.  One corner of our 5.8 acres is home to a 3 tiered garden.  We are in the process of cleaning it up, as the previous owners hadn't lived here for 2 years.  When we moved in, you'd think the previous owners had figured out a way to harvest weeds and had hit the jackpot about something that could be done with them.  We'd never seen weeds this tall before.  The truth is that the previous owners were avid gardeners, both vegetable and landscape.

Mid-summer weed garden
We we're told there was a garden in there somewhere
Late Fall weed garden
The Laird excitedly testing his new machete
Early Spring garden
Mid (tilled) & Lower (untouched) garden tiers


In addition to the garden, we have somewhat of a very old overgrown fruit tree orchard.  We have a huge Asian pear, fruit-less Bartlett pear, an over grown old apple  (with 3 varieties grafted together), and a few sweet and sour cherry trees.  Recently we discovered 3 more unrecognizable apple trees growing on the edge of the woods.  This past weekend, we planted 2 new apple trees, Honeycrisp and Macintosh.  In the fall we transplanted our raspberries from the city house, into a 30ft. row of 10 plants.  We also planted 6 blueberry plants in our newly designated "Blueberry patch".  The Laird has been excited to start asparagus, so he did that this past weekend as well.  
The Raspberry Row
Brand new raspberry shoots-
Seems to have survived the transplant & brutal winter


The blueberry plants were nibbled on by the deer, so they will be stunted.  We have since put up some wire cage around the smaller plants, in attempts to protect what is left.


Baby apple trees- Honeycrisp (foreground) & Macintosh
The new Rhubarb growth
Rhubarb a little further along


Perennial plants are the best.  All of the above are perennials and grow back each and every year!  Rhubarb, blueberries, raspberries, asparagus, and apples.  Initial investment and work is high, but they will continue to produce (if well cared for) for many years to come.

"If you build it, they will come"  ~ Field of Dreams
As is true for every gardener, if you build up a luscious garden, it is guaranteed that the animals will come.  In the city, we battled crazy little squirrels that liked to eat our homegrown tomatoes and garbage dive for pizza and various left overs.  At Redwoodshire, we will be tested and tried by the multitudes of animals wanting to come visit our garden.  The Laird is making plans to build a fence around the garden to protect it from the deer.  
Apparently we not only grow food, we grow bunnies too!  As we were doing some clean up around the barn 5 days ago, we discovered this little nest of baby bunnies- 5 in all. 

day of discovery

four days later

Well this is just the beginning! 

Wednesday, April 23, 2014

Something old & Something new- Dresser update

After 10 years of using white plastic Rubermaid drawers to hold my clothes, I finally own a dresser.  I purchased this dresser set for $150.  The brand is: Link-Taylor


The dressers are made of solid pine, likely from the 1970's.  The previous owner had them for 30+ years.  The detail across the top reminds me of a castle.  The pulls were outdated, and were in need of replacement.  Though it is not a tough task, there are a few simple steps when updating your dresser or cabinet pulls.

1) REMOVE old knobs or pulls by unscrewing from the inside of the drawer or cabinet door.
2) Set old screws aside (the new screws that come with hardware may not be the best fit)
3) If the old pull has 2 screws/ holes you will need to measure the distance between them.  This measurement is important to have when buying new pulls.  Old pulls often have random & uncommon spaces between screws which limited my choices.
4) Determine if all pulls are the same size-  I assumed all of the pulls on these dressers were the same, only to find that the smaller drawers had slightly smaller pulls.
5) Hardware is not that expensive, but the cost adds up when replacing a dresser set or kitchen cabinets.  I had to purchase 21 pulls!

Lowes & Home Depot have a decent selection of hardware for cabinets and drawers.  I really like the Rubbed Oil Bronze cup pull.  Gives furniture an old farm-style look, which I absolutely love.  So I picked out my 21 cup pulls, purchased them and came home ready to install them on my new/ old dressers.  That is when I discovered there were 2 different sizes!  So disappointed.  What should have been a quick project now was delayed.  Lowes did not have a matching cup pull of the size I needed.  So I considered drilling new holes- what a nightmare that would have been.  The Laird suggested I search the internet.  And I am so glad that I did, before taking the drill to my drawers.

I found the exact size pulls I needed at Knobsandpulls.com.  And they were cheaper than the original pulls I had purchased!


What a simple difference new pulls make!  This outdated dresser is looking better.  There are some minor repairs to make to the drawer tracks, which will be included in a later post....

Tuesday, April 22, 2014

The Rule of Thirds for a better Photo

My interest in photography started in second grade.  We went on a field trip to a local farm, and I brought my pink 110 film camera along to take pictures of the animals.  I even borrowed my mother's camera case with a shoulder strap for the big event.  Images of some of the pictures I took that day are imprinted in my memory.  Maybe I will find some of those old photos someday.

During those akward Junior High years, I brought a camera to school to take pictures of and with all my friends.  Friends were quite a huge part of my life as a high schooler.  They were everything to me!  I have quite a few of those old photos stored in boxes.  My junior year of high school, I got my first real camera- a Canon Rebel, for my first photography class.  Those photography basics have stuck with me ever since.  I loved photography.  In a time when one actually developed their film by hand and shined light through a negative onto white paper below; followed by soaking that paper in chemicals and magically watching an image appear on that previously blank paper.  I'd spend hours in that high school darkroom.  My senior year I had the opportunity to travel to Costa Rica and Mexico, and discovered the ease of taking striking photographs in different cultures.  Anything that is out of our ordinary, makes for an interesting photograph.  My dream then would have been to travel and become a National Geographic photographer.  But I followed a different path and have simply allowed photography to be a creative outlet and hobby.

THE RULE OF THIRDS
Composition in photographs is key.  
As you take your photo, use the grid as a guideline for where to line up your focal point(s).  You never want to place your subject right in the center.  The goal is to place your focal point on one of the green dots.  Never place people in the center.  Also, horizons should fall along one of the horizontal lines, rather than splitting the image in half.

Here are some photos from our trip to Peru, that demonstrate the Rule of Thirds.

the Camino Inca

Machu Picchu

Moray, Peru (need to crop out man in lower right corner)
(Clearly this stranger taking our picture had a little bit of photography composition knowlegdge)

Applying the Rule of Thirds simply makes your photographs more interesting and visually appealing!  Happy shooting.  For more information search "Rule of Thirds" on google and you will find many more helpful tips to improving your photography skills- from the basics to very advanced techniques.

Monday, April 21, 2014

A MUST HAVE for Felling Pine Trees

One of the first adventures at Redwoodshire, happened the day the Laird decided to fell 2 very large pine trees that had overshadowed the swimming pool for far to long.  The Laird could not comprehend why these trees had been permitted to live there, and continue blocking the sun to the pool.  What a misfortune!  Thankfully, the job went off with only a small casualty.  They calculated where they wanted that tree to fall; away from the pool, between the passive solar heating system and some other large pines.  They trimmed off some smaller branches.  Little John climbed up the tree and tied ropes to act as a guide for the felling process.  Friar Matthew conducted the process, and lumber jack Alexander worked heartily with all his might to assist the Laird with this job.   "Timber" they yelled as that first tree came crashing down!  Bringing those trees down was the easy part.  Then the real work began- cutting the massive trunk and branches into smaller pieces and hauling them into the woods.  It was a whole Saturday morning of grueling labor.  Being sustained by  only donuts, muffins, bagels and water (supplied by the Lady of Redwoodshire- me), they worked and worked and worked.  

  As I have little knowledge of the process of felling large trees, I have  discovered the most wonderful product to help remove that terrible sticky pine pitch.  Months after this adventure of tree felling, we are still cleaning up the remains.  The back woods are filled with massive piles of pine remains.    Eventually the Laird hopes to transform some of those large chunks of pine trunk into cool seats to go around the campfire pit.  A couple days ago, Miss Sarah and I were out for a stroll along the woods edge, picking up some of those small pine remnants and depositing them to their place in the woods.  When we were finished, we quickly noticed we had spots of sticky pine pitch covering our hands.  "How annoying" I said.  Miss Sarah responded, "I have "Miracle Salve" that will take it right off."  "Really?  What's it called?"  "Miracle Salve" she replied.  It was truly as good as she described it.

Burt's Bees Miracle Salve.  Rub a small portion over your hands or other affected body part.  Then rinse with water.  Smooth and soft again, as if we had never encountered such stickiness.  

Timber!  First tree down, one more to go

Hi-Ho-Hi-Ho it's off to work we go
The aforementioned casualty: a lone bush planted in the middle of the grassy field.   It appears to have buds growing, so we think it survived the trauma of Pine number 1.


Sunday, April 20, 2014

Farmhouse Stair Renovation- Part 1


On our first walkthrough of Redwoodshire, we identified a few problems that caused us to reconsider our motto that "you can always change a house, but you cannot change the land."  My husband (whom I will now refer to as "the Laird" of Redwoodshire) and I thought, "how bad could it be?"  We drove away that day thinking that it was "that" bad.  But after some brainstorming and outside input, we came up with some solutions to the problems we found with the house.

First issue at hand: the steep & narrow staircase

The Laird practically hit his head on the ceiling whenever he walked up or down the stairs.  A problem for any person of normal height, myself not included in that population.  This would definitely be a daily annoyance for the Laird, if left as is.  

Second issue at hand:  the short ceilings throughout the second floor (an issue we will address later)

So we put in a new set of stairs in an L shape configuration.  Refer to previous image for comparison. We eliminated the hallway (to the left of original staircase), and moved the new stairs into that area.  This allowed for a normal rise in stairs, rather than steep stairs.
Newly installed L staircase.  The hole in the floor is the opening of the basement access stairs that were previously under the original stairs.  This change opened the room up and added a much needed closet.
The closet wall with finished drywall.  Access to basement converted to a trap door opening.
Now for the FUN part, painting and staining.  We opted for a "farmhouse" staircase-  stained treads with painted risers and stringers.
STEP 1)  Use hand sander to lightly sand tread surface with grit 220 sandpaper.

STEP 2)  Use painters tape to protect where the treads meet the risers.  This is to prevent too much stain from getting onto the areas that will be painted white.  Unfortunately the tape is not that effective, and stain still seeps through.  


STEP 3)  I used a regular utility rag (found in the paint/ stain section at Home Depot/ Lowes).  You can also use a brush (meant for use with oil based stains), however soaking the towel and rubbing over the surface works great.  Apply stain evenly and allow to dry for 5-15 minutes- longer for deeper & darker color.  Then use a clean/ dry rag to wipe up any stain that is still wet.  Allow to dry 4-6 hours.   Apply a second coat for a deeper/ darker color.  I did 3 coats, for good measure- however not at all necessary.


 Step 4)  POLYURETHANE STAIR TREADS

I used Miniwax Fast Drying Semi-Gloss(Satin, Semi-Gloss & Gloss options) polyurethane. Turn can over in circles (but do not shake- this will produce air bubbles in stain) until well mixed. Using a cheap 2" foam brush, apply the polyurethane in thin coats using long strokes.  Be careful no to get air bubbles.  If you do get some air bubbles, they can be gently sanded out by hand once polyurethane is completely dry. Allow to dry the recommended time (4-6 hours for 1st/ 2nd coats).  Use grit 220 sandpaper (by hand) between coats to rough up surface and allow finish to stick better.  After final coat, allow 12-24 hours to dry before heavy usage/ shoes.


Step 5)  TAPE STAIR TREADS.  Now it is time to tape the stair treads to protect from paint used on risers and stringers.  Like previously noted, painter's tape doesn't work perfectly, but it is a good guide.

Step 6)  Paint risers and stringers with a paint brush.  Allow sufficient time to dry and then apply 2nd coat.


VERY PLEASED WITH THE **SEMI-FINISHED STAIRS!  It was a long process, considering all the steps and wait time for drying.  I did one step/ coat a week over the period of a month, as that is what time I had available.  Because we were living and using the stairs in the process, it was important to consider only doing every other stair in each session, so that you can still use the stairs while the others are drying.  

**  We have yet to install the newel posts, balusters, railing...  They are stained, painted and ready to go- just waiting for carpenter to install.  Will update once they are done.  

Railing & newel posts- stained
Balusters- painted

Oil based stains are very stinky and it is important to wear a face mask to prevent inhaling toxic fumes.  Search oil vs. water based stains to figure out what best meets your needs.